
How to Install Engineered Hardwood Floors:
4 Easy Installation Options
How do you correctly install engineered hardwood floors? Now that you have your flooring, you want to turn heads right away. To do so, you must first learn what installation method works best for you and your home.
By learning more about engineered wood flooring, and its four methods of installation, you can install your new floor in no time at all. Whether you’re starting a DIY project or wanting to know more about the process, this guide will help you along the way.
By learning more about engineered wood flooring, and its four methods of installation, you can install your new floor in no time at all. Whether you’re starting a DIY project or wanting to know more about the process, this guide will help you along the way.
What is Engineered Hardwood Flooring?

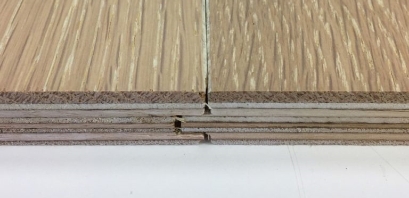
Engineered hardwood is the newest alternative to solid wood flooring. Composed of man-made materials, each engineered wood plank is topped with a thin layer of real wood veneer. Complete with life-proof features such as water-resistance, each plank either has a high-density fiberboard (HDF) backing, a plywood backing, or a stone-plastic composite (SPC) core and, in some cases, an attached underlayment.
Advantages of Engineered Hardwood
Advantages of Engineered Hardwood
- More affordable than solid wood: You get the high-quality visuals of real wood without that big price tag, and nobody will be able to tell the difference.
- Every plank is unique: Since this is a real wood veneer, you’ll never find a repeating pattern or an unconvincing texture.
- Moisture resistance: Depending on the core of your flooring, your engineered wood could be moisture resistant or even 100% waterproof.
- Install it anywhere: High moisture resistance means you can install it in bathrooms, kitchens, laundry rooms, and even basements! No grade level of your home is off-limits.
Engineered Wood Installation Preparation
To make sure your flooring installation is done correctly, you should first prep the engineered wood planks and the subfloor. These steps will ensure your new floors will look great and stay put for years to come.
Plank Prep
Once your flooring arrives you should NOT install it right away. Before installation, the planks should acclimate to the room’s climate.
Engineered wood can expand or contract in humid temperatures causing the floor to buckle if not properly acclimated. Allow the planks to sit for 24 hours to adjust to the room’s temperature before installation.
Engineered wood can expand or contract in humid temperatures causing the floor to buckle if not properly acclimated. Allow the planks to sit for 24 hours to adjust to the room’s temperature before installation.
Subfloor
While your floor is acclimating to the room’s temperature, start preparing the subfloor for new flooring. Remove baseboards, old nails or staples, and loose dirt.
Underlayment
You should always install engineered wood over an underlayment. Moisture barriers and underlayment prevent moisture build-up under your floors, keep your floors warm, reduce noise, and even out subfloor imperfections. This extra support under your floors will lengthen the lifespan of your engineered wood planks.
How to Cut Engineered Hardwood

Learning how to cut your engineered wood planks is an important part of the installation process. Thankfully, with the right tools, it’s a simple process. Check it out.
- Some floors and their wear layer can create excess dust when cutting the planks. For safety, be sure to wear a mask when cutting the planks.
- Mark the top side of the plank where it should be cut using chalk or a pencil
- Using a table saw, miter saw, circular saw or hand saw, cut the plank with the finished side up.
Method 1: Floating Floor Installation
The floating floor method is the most common for engineered wood floors. The process involves inserting the tongue of one plank into the groove of another and locking them together. Floating floors require nothing more than the planks, and depending on your floor, some tongue and groove glue.
Tools and Materials
Before we go into this process step-by-step, let’s talk about what tools and materials you’ll need to install a floating floor.
Tools
- Tape measure
- Pen
- Safety glasses
- Knee pads
- Ruler
- Rubber mallet
- Tapping block
- 1/4″ spacers
- Tile cutter or table saw (to cut planks)
Materials
- Engineered hardwood floor planks
- Floor transitions and moldings
- Tongue and groove glue (depending on your engineered wood product)
How to Install Floating Engineered Hardwood

Now let’s lay some engineered wood flooring!
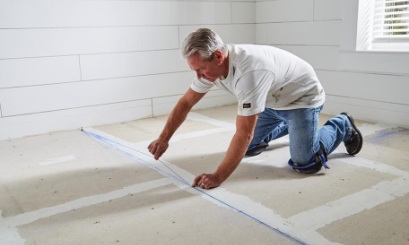
- Starting on a clean subfloor, place spacers between the wall and the planks. Use your spacers to ensure there is a ¼” expansion gap from the wall.
- Set the first plank in the corner of the room, working from left to right. Complete the first row by interlocking the tongue and groove connectors with tongue and groove glue (if recommended by the manufacturer) and aligning the seams. Make sure you wipe away any glue that squeezes through the boards.
- When you run out of space in a row, simply measure the gap between the wall and the last plank, then mark and cut the next plank to fit. (For cutting instructions refer to the section above.)
- Use the leftover cut ends that are at least six inches long to begin your next row. This will stagger the planks and give them a more natural wood floor look.
- Continue moving down the room ensuring that the planks are interlocked and all the seams have a tight fit by using the tapping block and rubber mallet to tap the planks into a locked position. Add spacers every few feet around the edges of the flooring and remove them when the installation is complete.
Method 2: Glue-Down Installation
The glue-down method of installation is ideal for flooring in a high traffic area, as it adds more permanence to your floor. Essentially, you spread glue on the subfloor before installing the planks, and this keeps the floor in place.
Tools and Materials
For this installation, you’ll need a few more tools to ensure ease while working. Remember, when working with glue, it’s essential to wear cleaning gloves.
Tools
- Tape measure
- Notched flooring trowel
- Pen
- Knee pads
- Safety glasses
- Cleaning gloves
- Bucket
- Ruler
- Rubber mallet
- Tapping block
- 1/4″ spacers
- Tile cutter or table saw (to cut planks)
Materials
- Engineered hardwood floor planks
- Floor transitions and moldings
- Flooring adhesive*
How to Install Glue-Down Engineered Hardwood

- Starting on a clean subfloor, place spacers to create a perimeter around the room. Use your spacers to ensure there is a ¼” expansion gap from the wall.
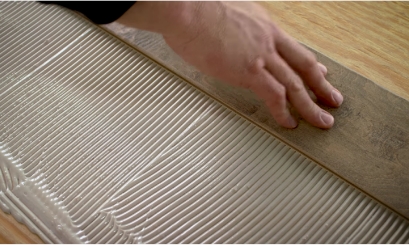
- Apply the adhesive to a small area in a corner of the room. Pour a workable amount on the subfloor, enough for about two to three rows of planks, then use the trowel to spread the glue. Continue to spread the glue in small sections as you install.
- Working from left to right. Complete the first row by connecting the planks with their tongue and groove connectors.
- Tap the second row of planks using a tapping block and rubber mallet.
- Stagger the planks by using the leftover cut ends that are at least six inches long to begin your next row.
- Continue moving down the room, ensuring that the planks are connected and all the seams have a tight fit by using the tapping block and rubber mallet.
- Once the installation is complete, remove spacers and add transition strips and molding as desired.
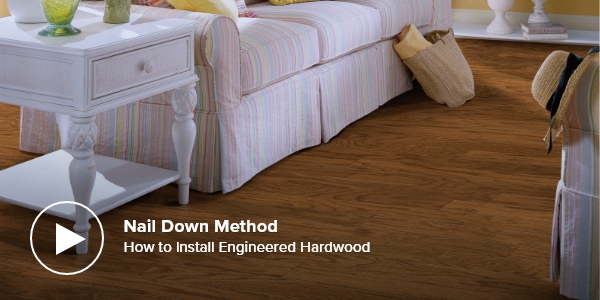
Method 3: Nail-Down Installation
For a more heavy-duty installation, nailing down your engineered wood flooring is a popular option for those who are comfortable with a nail gun. It follows the same preparations and process as the other methods but requires a plywood subfloor.
Tools and Materials
Instead of any sort of glue, the nail-down method requires a few more tools.
Tools
- Nail gun
- Nail punch
- Knee pads
- Tape measure
- Pen
- Safety glasses
- Ruler
- 1/4″ spacers
- Tile cutter or table saw (to cut planks)
Materials
- Engineered hardwood floor planks
- Floor transitions and moldings
- Matching wood putty
How to Install Nail-Down Engineered Hardwood
- Place spacers to create a perimeter around the room, leaving a ¼” gap between the wall and planks.
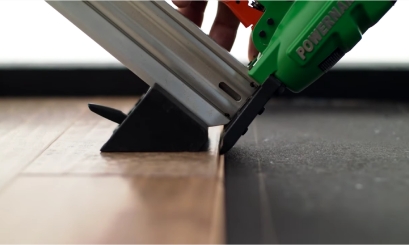
- For your first row, face the tongue of the plank towards the center of the room. Then pre-drill and nail the planks down with finishing nails about 1 inch away from the wall and 3-4 inches apart. Pre-drilling prevents the plank from cracking and makes installation an easier process
- Once you finish nailing down the plank, you need to countersink the nails. This hides the nails and creates a more appealing look for your floor. To countersink the nails, simply hammer them beneath the surface of the wood using a nail punch to protect the wood from damage.
- After countersinking all the nails, fill the holes with a matching wood filler.
- If you run out of space in a row, measure the gap between the wall and the last plank, then mark and cut the next plank accordingly. (For cutting instructions refer to the section above.) Stagger the planks by using the leftover cut ends that are at least six inches long to begin your next row.
- When installing the following rows, nail the planks at an angle just above the tongue using your nail gun. Be sure to countersink the nails so they don’t get in the way of the tongue and groove connection between planks.
- Continue this process until the floor is completely covered, then remove your spacers and add your transition strips and molding as desired.
Method 4: Staple-Down Installation

If you prefer staples over nails, there’s the staple-down method of installation. Stapling down your engineered hardwood is a very similar process to nailing it down with a few minor differences. However, both nail-down and staple-down installation methods require a plywood subfloor.
Tools and Materials
Grab your toolbox and see what tools you need to get your floor fastened to the ground.
Tools
- Staple gun
- Nail punch
- Knee pads
- Tape measure
- Pen
- Safety glasses
- Ruler
- 1/4″ spacers
- Tile cutter or table saw (to cut planks)
Materials
- Engineered hardwood floor planks
- Floor transitions and moldings
- Matching wood putty
How to Install Staple-Down Engineered Hardwood
- Place spacers to create a perimeter around the room, leaving a ¼” gap between the wall and planks.
- For your first row, face the tongue towards the center of the room then pre-drill and nail the planks down with finishing nails about 1 inch away from the wall and every 3-4 inches along the length of the plank.
- Then, use a nail-punch to countersink the nails and fill the hole with a matching wood filler.
- When installing the following rows, drive staples at a 45-degree angle right above the tongue of the plank. Repeat this process every 3-4 inches down the length of the plank. NOTE: Place staples so they don’t disturb the tongue and groove system.
- If you run out of space in a row, simply measure the gap between the wall and the last plank, then mark and cut the next plank accordingly. (For cutting instructions refer to the section above.)
- Stagger the planks by using the leftover cut ends that are at least six inches long to begin your next row.
- Continue this process until the floor is completely covered, then remove your spacers and add your transition strips and molding.
FAQ

Now that you have an idea about each installation process, do you have more questions? Have no fear! Know the most about your engineered wood floor before installing it by checking out our most asked questions.
Is engineered hardwood waterproof?
Thanks to its multi-layered design and sturdy core, all engineered wood resists water better than solid hardwood. But only planks with the stone-plastic composite (SPC) core are 100% waterproof.
Can I install engineered hardwood myself?
There are four ways to install engineered wood flooring, and all can be done by yourself. While the floating floor method is more catered to a DIY flooring project, glue-down, nail-down, and staple-down methods also work without a professional. Just be sure to contact your flooring manufacturer for complete installation instructions.
What is the best method to install engineered hardwood flooring?
There are four methods to install your engineered wood flooring. You can float the floor, glue the planks down, nail them down or staple them down and have a new gorgeous floor in no time.
What makes one method the “best” depends on your comfort with different tools and where you’re installing it. For instance, a floating floor installation requires no power tools and is recommended for low-traffic, residential areas. Whereas the nail-down installation method uses a nail gun and is best suited for commercial installations.
What makes one method the “best” depends on your comfort with different tools and where you’re installing it. For instance, a floating floor installation requires no power tools and is recommended for low-traffic, residential areas. Whereas the nail-down installation method uses a nail gun and is best suited for commercial installations.
Is it better to glue or float an engineered wood floor?
Glued-down engineered wood is a more permanent flooring solution and is meant for high-traffic areas. Floating engineered hardwood is built for residential use and has a more DIY-friendly installation process. It’s important to understand your flooring needs as well as your comfort level with installing flooring to determine whether it is better to glue or float engineered hardwood.
How long do engineered hardwood floors last?
The lifespan of engineered wood flooring can range from 20-80 years. The livelihood of the floor comes down to the thickness of the plank, its wear layer, and how well you take care of your floors. If the plank is thinner, it could last 20-30 years, whereas if a plank is thicker, it could have a lifespan of 40-80 years.
Is underlayment necessary for engineered hardwood floors?
Underlayment is an important part of installing engineered wood flooring. It stops moisture build-up under your floors, keeps your floors warm, reduces noise, and evens out subfloor imperfections. This extra support will lengthen the life of your engineered wood floors. For even more convenience, some engineered hardwood flooring comes with attached underlayment.
Can you lay engineered hardwood over hardwood?
Engineered hardwood can be floated over laminate, vinyl, and solid hardwood floors. Other installation options such as glue-down or nail-down are not recommended when installing over existing floors.
Where can I install engineered hardwood?
Because of its high moisture resistance, you can install engineered hardwood in bathrooms, kitchens, laundry rooms, and even basements. Engineered wood is durable enough to be installed in both residential and commercial settings, so your business and your home will look great. Plus, there’s no grade level of your home that’s off-limits. Some planks are complete with an attached underlayment, making them ready for anything in every room of the house.
Should engineered wood acclimate before installation?
No matter how you install it, engineered hardwood must acclimate to its new environment for at least 24 hours to adjust to the temperature and humidity of the area. While engineered hardwood does not expand and contract as much as hardwood, acclimation can ensure proper installation and durability.
How do you cut engineered hardwood?
Cutting engineered hardwood is very simple with the right tools. First, for safety, be sure to wear a mask when cutting the planks. Before making your cut, check the cutting instructions for your particular flooring, then mark the top side of the plank using chalk or a pencil. Finally, cut the plank with the finished side up using a table saw, miter saw, circular saw, or hand saw.
Conclusion
How does it feel to be an engineered hardwood installation master? You’re now ready to start installing your beautiful flooring like a pro. If you want some installation accessories, we have you covered.