
While some people would consider a DIY tile project too much of a challenge, it’s not impossible! With the right tools and enough preparation, you can learn how to tile a floor the right way.
And guess what? I’m here to help you with that! To assist in your installation, here’s a step by step guide that will walk you through the challenges and pitfalls of laying floor tile on your own.
No matter if you’re looking to tile a bathroom floor, a shower floor, or even a kitchen, this guide has everything you need to make your project a success.
In this guide, you’ll learn what materials you need for a proper installation, how to prepare your subfloor, how to plan your tile layout, how to grout tile once it’s installed, get answers to FAQs, and much more.
| Related Content >> How to Install Daltile Revotile |
What You Will Need to Lay Floor Tile
Tools
Tile cutter, Rubber mallet, Carpenter square, Level, Pencil, Notched trowel, Rubber grout float, Tile spacers, Tape measure, Power drill, Sponge, Tile nipper
Materials
Five gallon mixing bucket, Grout haze remover, Tile, Mortar, Grout, Sealer, Painter’s tape, Safety glasses, Knee pads, Rubber gloves
Step One: Preparing Your Subfloor

Determine what subfloor you have
Subfloor prep will depend on whether you have a concrete subfloor or a plywood subfloor. Concrete subfloors are a bit easier to prepare for a tile installation than plywood, but it’s important to be thorough no matter what subfloor you have.
Even if you’re installing tile yourself, you need to consult a contractor to make sure your subfloor can hold the weight of the mortar, tile, and furniture in the room once the project is complete.
How to prepare a concrete subfloor
Your concrete subfloor should be clean, dry, and level. If the concrete is new, it needs to cure for three to four months before installation can begin. You also need to fix any leaks or moisture problems before you start your project.
Start by testing to see if the concrete is water-penetrable, which will tell you if you can achieve a good bond. Sprinkle water over the subfloor and make note if it soaks in or beads on the surface.
If water soaks into the surface, you can get a good bond with the tile. However, if water beads up, there are surface contaminants that you need to remove before installation can be successful.
Make sure no water is seeping into the subfloor from below. Check for any dips in the surface by sliding a long straight edge around the room. Fill any low spots with a self-leveling underlayment and allow it to dry before moving forward. Once the surface is level, clean and rinse the subfloor with water to ensure there are no residues left behind.
How to prepare a plywood subfloor
Measure the space and cut cement backer board to fit. Adhere the backer board to the plywood with thinset adhesive, leaving a 1/8” gap between the sheets, and a 1/4” gap around the edges of the room. Make sure the seams of the backer board don’t align with the seams of the wood subfloor.
Next, fasten the backer board to the floor with screws spaced six to eight inches apart. Set the screw heads beneath the surface of the board to ensure that it’s completely level.
Use glass fiber tape specifically made for backer board to reinforce the joints. If the tape is non-adhesive, fill the gaps between the boards with mortar before applying the tape. Finally, cover the tape with a thin layer of mortar and allow it to dry completely before proceeding.
| Related Content >> Floor Tile Buying Guide |
Step Two: Measuring the Room

Snap Chalk Lines
The starting point for your project will depend on what works best for you. Some people may choose to start tiling in the center of the room, while others might prefer the corner. Before you begin, make sure that your starting point is square by using a carpenter’s square. If you find that the walls of the room are not square, account for that difference as you snap your chalk lines. Always remember the width of your trim when measuring the room.
Step Three: Test Your Tile Layout

Unbox and mix up your tile
Minor color variations between manufactured batches can be more noticeable if you install tile box by box.
Do a dry lay of your tile
Before mixing any mortar, lay out two half rows of tile, starting from the starting point and moving toward the walls in perpendicular directions. Use spacers between each tile.
Avoid tile fragments along walls
If the end of either test row doesn’t give you enough space to fit at least a third of a tile, adjust your chalk lines and starting point. To keep the appearance of the room balanced, you’ll want to make sure there is at least a third of a tile at each end of the room.
Step Four: Mixing the Mortar

Read the instructions
The manufacturer will provide specific instructions to gain the right consistency for your mortar, also known as thinset. Read the instructions carefully before beginning your mixture.
Mix the mortar
Combine your materials in a large bucket, and mix them using a paddle attachment on your power drill.
Let the mortar stand
Most mortars require at least ten minutes to rest after mixing before they are ready to use. This time lets the components of the mixture “slake,” or activate. Some types of quick-setting mortar won’t require a slake time, and you should start spreading immediately after mixing. Always check the manufacturer’s instructions to be sure.
Continue mixing mortar
Instead of creating one large batch, mix thinset as you go along. Creating too much mortar at once might cause it to harden before you get a chance to use it all.
Clean the mixing paddle
To avoid hardened debris on your mixing paddle, clean it immediately after use.
| Related Content >> Porcelain vs. Ceramic Tile |
Step Five: Apply the Mortar

Use a trowel
Trowels are designed to have one straight edge and one notched edge with teeth. The size of the teeth depends on the trowel size, and different tiles require different teeth sizes. Check the manufacturer’s instructions to determine the correct trowel size to use. A good rule of thumb is that larger tiles will require larger trowel notches.
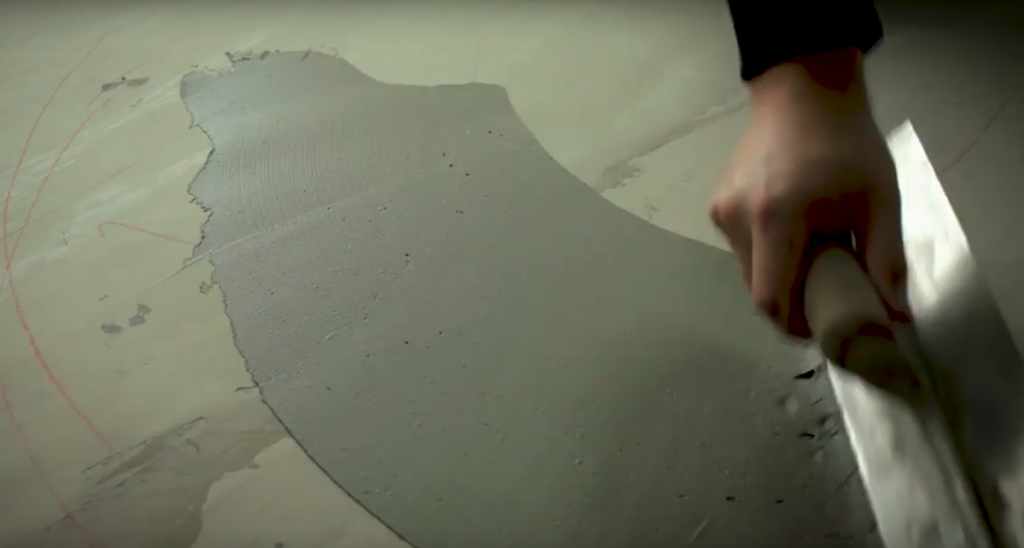
Spread the mortar
Take some thinset from the bucket using your trowel, and start applying a workable amount at the starting point. Spread it across one section of the installation area using the flat side of the trowel at a 45 degree angle.
Comb the mortar
Using the notched side of the trowel, press into the evenly spread mortar at a 45 degree angle. Make sure you are only moving the trowel in one direction. This step ensures that the correct amount of thinset has been applied, and it prevents air from getting trapped under the tiles when they are laid.
| Related Content >> Wall Tile Buying Guide |
Step Six: Floor Tile Installation

Lay the first tile
At the starting point, press the first tile into the thinset and twist it slightly into place to make sure it’s properly applied.
Use tile spacers
Once the first tile is laid, place spacers along the edges to ensure identical spacing between each tile. Make sure the spacers are applied vertically so you can retrieve them from the thinset when it’s time for grout. There are several factors in determining the necessary spacer size for your tile. Be sure to follow the manufacturer's recommended grout joint size for your product.
Follow your chalk lines
As you begin installation, make sure to follow your guide lines to keep the tiles straight.
Give yourself a way to exit
It takes at least 24 hours for standard thinset to dry, and you shouldn’t walk on the tile during this time. Make sure you don’t trap yourself with no way to exit the room as you install your tile.
| Related Content >> Floor Tile Trends |
Step Seven: Clean and Level the Tile

Level the tile surfaces
Once all tiles are placed in a section, level uneven surfaces before the mortar has a chance to set. You can accomplish this by gently tapping on the tiles with a rubber mallet. This will level the tiles and firmly press them into the thinset.
Clean the tile surfaces
Use a damp sponge to wipe away any mortar that gets on the surface of the tiles. Don’t allow any mortar to harden on the top of the tile, as it is extremely difficult to remove.
Fix any alignment issues
Before the mortar has a chance to set, check to make sure there are no alignment issues with your tiles. If you have gaps that are too large or too narrow, or crookedly applied tiles, you can gently adjust them before the thinset hardens.
| Related Content >> How to Install Backsplash Tile |
Step Eight: How to Cut Floor Tile

Lay all full tiles in the room
Cutting tile can be a lengthy process, so it’s a good idea to lay all full tiles before starting on the partial pieces. Each quadrant of the room will have spaces along the edges for partial tiles. Make sure no thinset is allowed to harden in these spaces, since this will cause installation issues. Leave these spaces open until all full tiles have been installed and the mortar has set.
Measure your tile
To measure when you need to cut a tile, place it over the full tile adjacent to the space you want to fill. Use two tiles placed vertically against the wall to account for grout and expansion space. Use a straight edge to draw a cutting line along the surface of the tile. Once the tile is cut along this line, it should fit perfectly in the open area with room for spacers and potential wall expansion.
How to use a tile cutter
No matter how thick your tile is, we recommend you rent a wet saw to make any cuts. Always use protective gear when operating a wet saw, and always follow the manufacturer’s instructions for operating the tool.
To use, align the saw guide until the blade matches up with the cut line on the tile. Using both hands, steadily but slowly press the tile into the blade until the cut is complete. If you choose to use a wet chop saw, align the blade over the cut line and lower the blade to make the cut.
How to make specialty and curved cuts in tile
Mark the lines of the cut and use a tile nipper to gradually snip away pieces of the tile until it matches the desired shape. Always make sure to wear protective eye gear during this process.
How to even jagged tile edges
If any breaks occur, you can remove jagged pieces and smooth the edges. Use a tile nipper to snip off the sharp areas. You can also file away rough edges.
| Related Content >> Tile Patterns Guide |
Step Nine: How to Grout Tile

Remove spacers and prepare grout
Once all tiles are installed and the mortar is set, remove all spacers and calculate the amount of grout you will need. You can find calculation instructions on the grout packaging. Use painter’s tape to cover any baseboards, trim, and other nearby flooring that might come into contact with the grout.
Mix the grout
Not all grout requires mixing before it’s ready to use, and the composition of your grout will depend on tile joint thickness and how you want to use your space. If your grout does need to be mixed, combine the components in a large bucket with a paint stirrer stick or a margin trowel.
Just like with mortar, let the mixture set for ten minutes, or as recommended by the manufacturer. Don’t mix too much at one time, or it could be dried out before you have a chance to use it.
| Related Content >> How to Choose Grout Color |
Apply the grout
Using a grout float, smooth the grout into the gaps between your tiles with sweeping motions. The grout float should be held at a 45 degree angle, and should be applied diagonally to keep the grout level consistent between tiles. Make sure joints are completely filled by the grout. Remove as much excess grout as you can during application.
Clean grout lines
Setting time for grout will vary by composition and type, but you can get a good estimate from the manufacturer’s instructions. Before the grout has a chance to set, wipe down the tile surface with a damp - but not wet - sponge. Excessive water before setting can ruin the grout. Any remaining grout on the tile surface can be removed with a grout haze solution.
Seal the grout
Depending on the type, it can take up to a few days for grout to completely cure, so avoid walking over the tile during this time. Once the grout is completely cured, apply a seal to waterproof the grout and make it easier to clean.
Application methods will depend on the product you choose, but be sure to remove any excess sealer before it has a chance to dry on the surface of the tile. You will need to reseal the grout after a year or two. If you see drops of water absorbing into the grout lines, then you know it’s time to apply sealer again.
| Related Content >> Tile Grout and Thinset Guide |
Step Ten: Finishing the Project


Install all trims and transitions
Remove any protective coverings in the room, and install a trim to cover the gaps along the walls. Also install any transitions or thresholds to give your flooring a finishing touch.
| Related Content >> How to Clean Tile |
Tile Installation FAQ
If you still have questions, check out this FAQ to explore the most commonly asked questions about tile flooring installation.

Where do you start when laying tile?
You can start laying tile anywhere in a room, as long as you make sure the area is squared and you do a dry lay of your tile. Some people start tiling in the center of a room to ensure there aren’t any tile fragments along the walls. Others prefer to start tiling in a corner, because it’s easier to square up this way.
Can you tile on plywood?
You can install tile on plywood, as long as it can hold the weight of your additions. You will need to install a cement backer board over the plywood subfloor, as well as the mortar and tile. These additions can get very heavy, so you should always consult a contractor to make sure your subfloor can handle the weight.
What do you put under tile floor?
A cement backer board over a plywood subfloor is the typical underlayment for a tile floor. If you don’t want to use a backer board under your tile floor, you can choose a waterproof membrane as a substitute, and adhere it to the subfloor with a layer of thinset mortar. You can also use rubber sheet underlayment.
Can you lay tile directly on concrete?
You can lay tile directly on your concrete subfloor, as long as the surface is porous and level. If there is any paint or residue on the surface, your thinset won’t bond to the subfloor, and your tile won’t adhere. You can wash it with an acid-based cleanser or a power washer. Also ensure there are no moisture issues or leaks before you install tile over concrete.
| Related Content >> Best Tile Flooring Options |

Can I start tiling in a corner?
As long as you properly measure the room and make sure there won’t be small pieces of tile at any of the edges, you can start tiling in a corner of the room. Make sure you’ve snapped square lines and tested a dry lay of the tile to ensure the measurements are correct.
Do you tile wall or floor first?
If you’re tiling the walls and floor of the same room, most contractors recommend tiling walls before starting on the floor. This way, you’re not working on a newly tiled floor and potentially scratching it as you tile the walls.
By starting with the walls, you are also saving yourself some time by not having to wait on the floor to set before starting. In practice, people often install all wall tiles except for the bottom row, then install the floor tiles, and finally cut the last row of wall tiles to fit over the floor. However, you can install the entire wall first if you wish.
How do you check if tiles are laid properly?
The best way to check if your tiles are laid properly is to gently press and try to shift the tiles with your hands. If you notice any shifting, then it isn’t properly bonded. You can also gently tap on the surface with a knuckle to determine if there are any hollow sounds. Hollow sounds can indicate a tile bonding issue.
How do I tile a bathroom floor around a toilet?
Tiles should be installed under a toilet, not around it. To tile in a toilet area, start by shutting off the water supply and flushing all water out of the toilet. Remove the toilet and the wax seal ring (you will need to replace the wax ring with a new one).
Once the floor is properly cleaned and prepared, dry lay the tile, leaving a 1/4” gap around the drainage pipe at most. Measure and make any necessary cuts before applying thinset and laying all the tiles the room. Grout the tiles and allow the whole floor to dry before reinstalling the toilet with a new wax ring. Connect the water supply to the toilet, and enjoy your newly tiled floor!
| Related Content >> Grout FAQ |
Conclusion
And that’s it! now you know how to tackle your project, you've got all the answers to the most frequently asked questions, and you're ready to go. As you continue planing your tile installation project, you can move forward with confidence.