How to Install Cork Plank Flooring
Please read the General information section before installation.
Inspection:
- Prior to installation, inspect cork planks in daylight for visible faults/damage.
- Check if subfloor/site conditions comply with the specifications described in these instructions.
- If you are not satisfied do not install, and contact your supplier
Tools and materials required:
- Electric saw.
- Expansion gap spacers.
- Pencil.
- Set square.
- PE film or 6 Mil Poly Vapor Barrier Sheeting.
- Adhesive tape.
Moisture Protection:
- Lay the PE film or 6 mil poly vapor barrier sheeting, allowing for at least 20 cm (8”) overlapping and tape.
- Turn the film upward 5 cm (2”) along the walls.
- Trim after the skirting boards are fixed.
Before laying:
- Measure the room at right angle to the direction of the planks.
- Planks in the final row should be at least 5 cm wide.
- For this purpose, planks in the first row can be cut to smaller size.
- Shuffle planks in order to obtain a pleasant blend of shades.
- Lay planks preferably following the direction of the main source of light.
- We recommend laying on wooden floors crossways to the existing floorboard.
- Planks must not be nailed or screwed to the subfloor.
- Skirting boards must not be fixed in a way which restricts the movement of the floor.
Expansion gaps:
- Provide 10 mm (3/8”) expansion gaps to the walls and other fixed objects.
- Areas greater than 100 m² (900 sq. ft) or 10 m (30 feet) in either direction, transitions between rooms and asymmetrical areas require extra expansion gaps
Start Install:
- Start in the corner.
- Turn the tongue side of the plank to the wall.
- Maintain a gap of 10 mm (3/8”) on the short side.
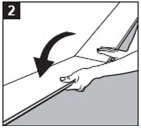
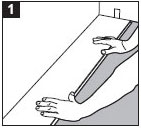
- Hold the next cork floor plank at an angle against the first one and lay it flat on the floor.
- Complete first row in the same way.