
Tile Patterns: How to Create 20+ Trendy Styles
| Fact Checked By: Ashley De Zeeuw
Published: December 19, 2019 | Updated: February 5, 2021
It’s easy to get stumped when it comes to choosing tile patterns. Lots of people want to follow trending tile styles, but they don’t know where to start, or how to get the looks they see online or in magazines.
All those squares and rectangles can be intimidating. After all, what can you do with a bunch of simple shapes? A lot, as it turns out! To gather inspiration and learn some design tricks, explore this guide to trending tile styles.
Get ready to be wowed by the hottest trends for single-tile, two-tile, and multi-tile layouts. Plus, you’ll discover fresh ideas for large format tiles and backsplashes. Just think of us as your one-stop-shop.
Related Content >> Tile FAQ
What Other Experts Are Saying
Today’s trends in tile are all about the wow factor. How creative and unique can you get? That’s the driving question behind tile design.
“Creative use of shapes, texture, and patterns are driving the current trends in tile. Examples include fabric textures, which give a softer, warmer feeling. Encaustic tiles and imitations provide a Victorian feel. Shapes, some traditional like hexagon and diamond, others ranging from fish scales to raindrops to arabesque are very popular as design features.
Depth and dimension, either actual high/low surfaces or the illusion of depth are preferred over the flat surface. Finally, subway tile remains popular but in larger formats, not just the traditional 3×6 size.” – Steve Radford, Daltile
“There has been a surge of unconventional tile shapes and layouts for 2020. Designing with different tile cuts in the same space is on the rise, and can make for stunning interiors! With the wide variety of shapes available, like long planks, diamonds and hexagons; the possibilities are endless. As with any trend, some will have more staying power than others. If you choose to get more creative with your pattern, it’s better to stay with natural or neutral colored materials for longevity of the design.” – Cynthia Flottmann, Roux Design Studio
While shapes are making a big splash, there’s still a lot of attention around texture, depth, and dimension. That’s where tile layout patterns come in, and they’re a staple of design. Don’t let the flashy stuff distract you from the crucial basics.
On that note, let’s explore the world of wall and floor tile patterns!
Single-Tile Patterns
One is the loneliest number, or so they say. But having only a single style of tile doesn’t mean your floor has to be boring. In fact, one tile on its own offers some of the most flexibility and versatility in design. This is especially true if you’re working with a subway tile over something more traditional like a square.
Related Content >> Tile Flooring Trends
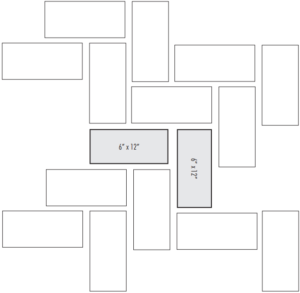
Herringbone
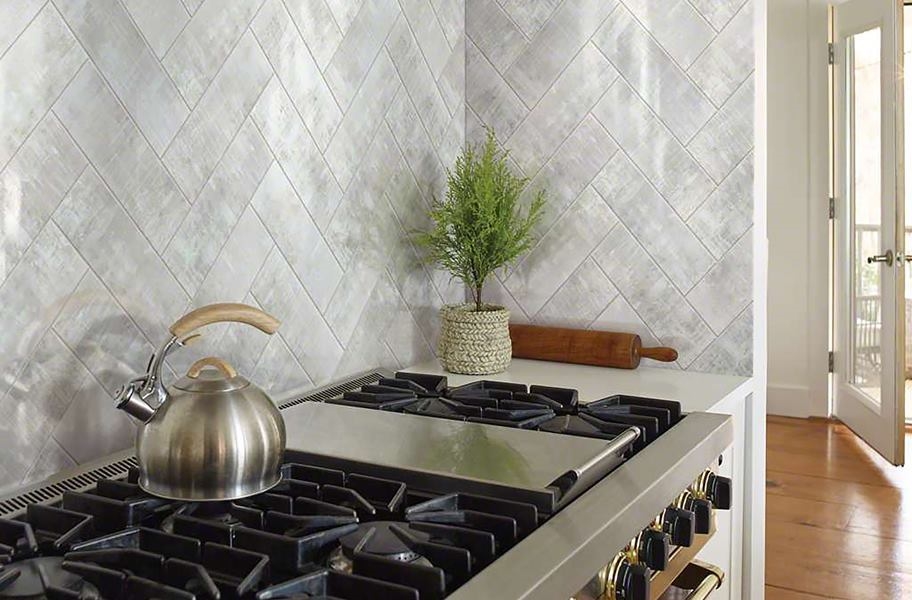
Ahh, the herringbone pattern – a modern classic. This is known by some as a zig-zag pattern, but whatever you call it, everyone knows this is probably the most popular style right now. You’ll find it on walls, backsplashes, showers, floors, and just about everywhere.
Those v-shaped rows of rectangles (either subway tiles or larger planks) really pack a punch when it comes to style. It’s simple yet bold, especially if you go for a contrasting grout color. Just think of your kitchen decked out with a bright white subway tile and a contemporary gray grout. Or, you could experiment with color and install vibrantly-colored subway tiles with crisp white grout to really set them off.
How do you lay tile in a herringbone pattern?
Start with a rectangular tile. The best size will depend on where you’re installing. Walls and backsplashes are better-suited to 6’ x 12” subway tiles and smaller, but you can go as big as a whole plank when working on the floor.
Create an L-shape with two tiles, placing the end of one tile at a 90-degree angle against the other. At the joined corner of the L-shape, place two more tiles to create another “L” and continue to repeat this pattern over the whole installation area.
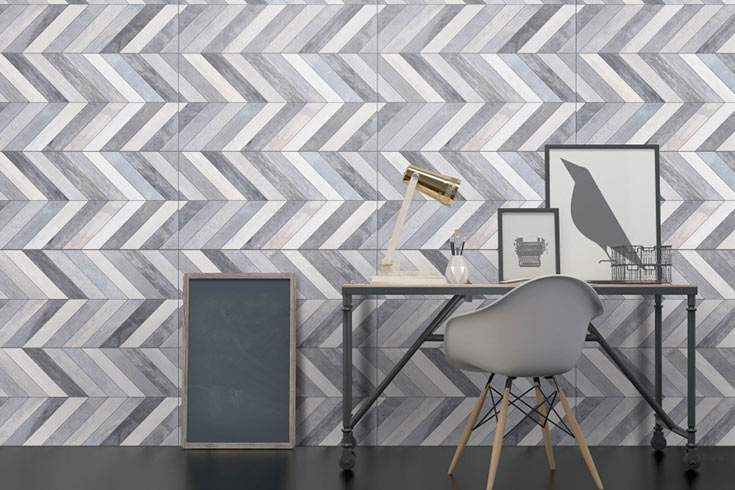
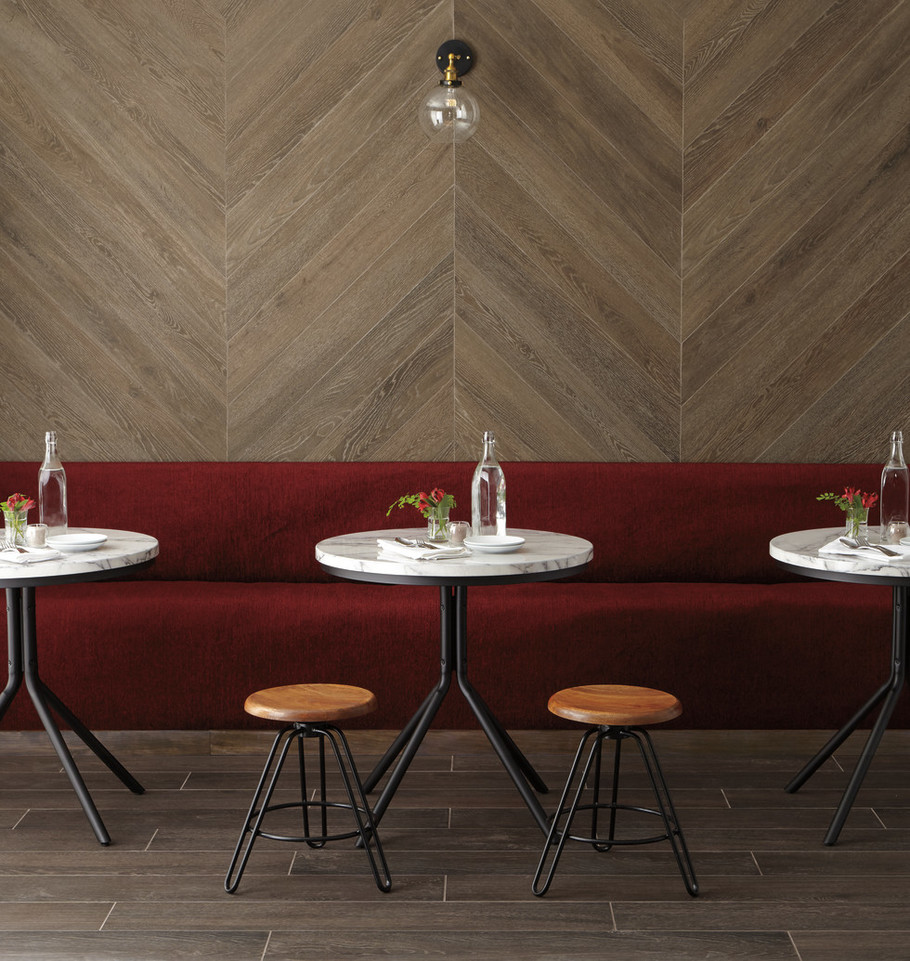
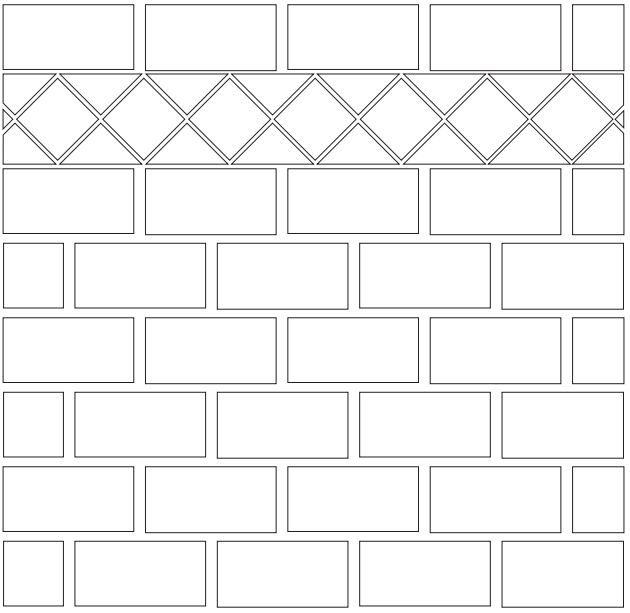
Chevron
![]()

A chevron is similar to herringbone in that they both have a v-shaped or arrow-shaped design, but chevrons require a bit more effort to get the look right. The tiles typically have to be cut before you can install them as chevrons. No L-shapes here! It’s all about angles and the geometry of the tile.
That said, the effort is definitely worth it. Those sharp, clean lines and angles are trendy and timeless all at once. Plus, chevrons are oh-so-versatile. Not satisfied with the angular awesomeness all on its own? Mix tile colors, textures, and finishes to add even more detail.
How do you lay tile in a chevron pattern?
You’ll need a tile cutter for this one. Choose long, thin rectangular tiles. Cut the short ends of the tile at 45-degree angles. Make sure to cut each end in a different direction.
After finishing the cuts, you want a parallelogram shape, not a trapezoid. Those newly-angled ends will meet each other in a point. Line the tiles up end to end to get that signature zig-zag look.
If that seems too time-consuming and costly, I’ve got great news for you. You can buy products that do the work for you! Some tiles are already cut into the angled style to save to the effort of cutting them.
Other manufacturers have taken it a step further and created large tiles with the chevron pattern already built-in. That means you just have to piece a few really big rectangles together like it’s a puzzle. Now that’s easy!
Related Content >> How to Choose Tile
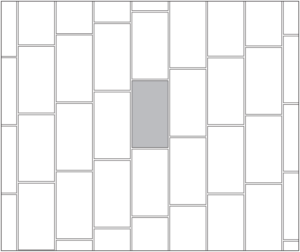
Offset/Running Bond
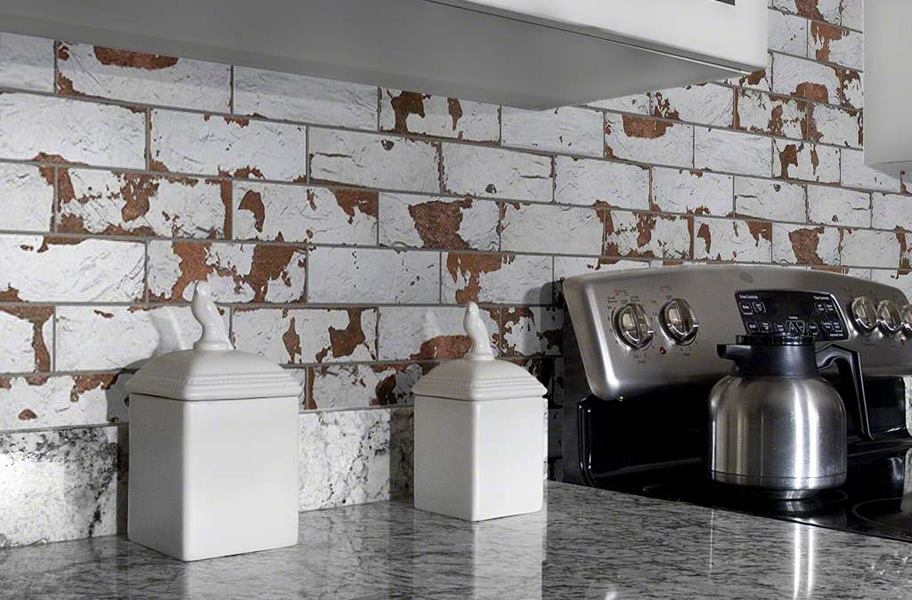
Sometimes, if it’s not broken, you don’t need to fix it. That’s how I feel when it comes to using the standard staggered brick layout for tile. Also known as a running bond, this offset tile pattern has been the go-to style for decades, and there’s nothing wrong with that.
It works with both square and rectangle tiles, it’s easy to install, and it’s not going out of style any time soon. For an authentic, industrial, or farmhouse feel, brickwork tile is the way to go.
You can also make a variation with diagonal brick. Add a new twist by installing the brick layout at a 45-degree angle to the wall instead of the straight-on standard. This style requires more tile cuts than the original, but it’s worth it for the chic, contemporary vibe.
How do you lay tile in a running bond pattern?
The brickwork pattern actually comes with a few variations that are important to note.
- 50/50: There’s the 1/2 or 50/50 offset where each tile starts a the center of the tile underneath it. It’s clean and contemporary, perfect for walls and floors alike. Don’t use a 1/2 offset for longer tiles and planks, since they could have subtle bowing that will be made obvious and create lippage.
- 40/60: The 1/3 or 40/60 offset has become more popular in recent years. Each tile starts 1/3 of the way into tile below it. Multi-colored tiles work well with this more natural-looking offset. You’ll also notice that many wood-look planks will have this layout. Additionally, some large format tiles are required to be installed with this offset to ensure proper installation.
- 30/70: An even more gradual offset like a 30/70 ratio creates a really staggered and natural look. If an authentic, not-too-polished aesthetic is what you’re going for, the more staggering the better. Some people even choose to have an almost random-looking offset for a waterfall effect.
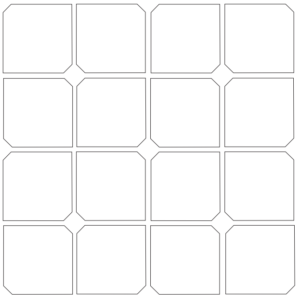
Grid/Stacked
Yes, the good ole’ grid tile pattern may be the most basic, but that doesn’t mean it’s out of style. In fact, there’s some elegance in the simplicity. The great thing about a grid is that you can use square or rectangular tiles, and you can orient them either vertically or horizontally.
While a horizontal grid is more common, stacking rectangular tiles vertically can emphasize the height of a space and make it feel roomier. Vertical stacking also looks especially good with large format tiles.
Patterned Tile Grid
With patterned tiles, all the personality is in the surface instead of the layout. The tiles do all the work for you when it comes to style, so you can go easy on yourself with a grid. In fact, a grid is usually the best choice when you have a really detailed, decorative tile like an encaustic tile.
Diagonal/Diamond Grid
If you want to take a grid layout to the next level, just give it a 45-degree turn and you have a diamond pattern, easy as that. Also known as a diagonal layout, this design works to make a small room look bigger, and if a room isn’t perfectly square, the angle can distract from that.
The diamond layout is commonly used as an accent tile, and it’s ideal for creating a modern look with the bare minimum of effort. Of course, it only works with square tiles. Sure, there will be more tile cutting around the edges of the room, but that shouldn’t scare you off.
How do you lay tile in a grid pattern?
Use square or rectangular tiles of any size. Align the edges of each tile so they line up in a clean, simple grid. It doesn’t get easier than that!
Crosshatch
The crosshatch or weave pattern evokes the look of woven materials while giving you the glam of tile. Even though the idea of weaving something might seem like an old-timey concept, this is actually a really modern geometric look.
Plus, it’s part of that trend of one material pretending to be something else. These days, there’s vinyl that looks like wood and stone, tile that looks like marble, and tile layouts that almost look woven. It’s a fun way to mix things up!
How do you lay tile in a crosshatch pattern?
There are plenty of ways to make a weave-like tile pattern, but the most basic way is to use 6” x 12” rectangular subway tiles. If you want to get really detailed and fabric-like, you can even go all out with ultra-thin tile “strips.”
To get this look, line up rectangular tiles until you create a square. For the next row, flip the direction of the tiles so they are perpendicular to that first “square” of tiles. Do this until you complete another “square.” Then flip the direction again. It’s just like you’re weaving tiles under and over each other!
Designer Shapes
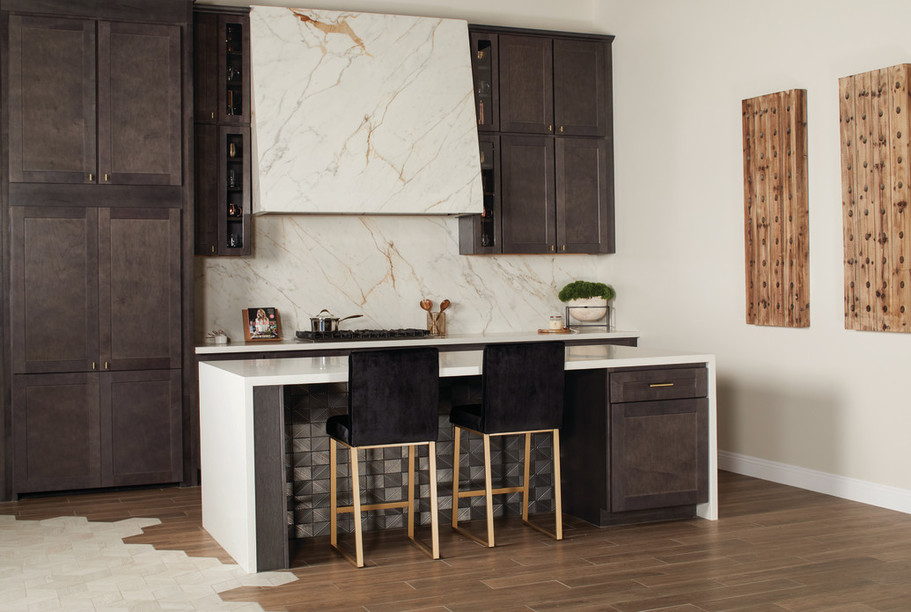
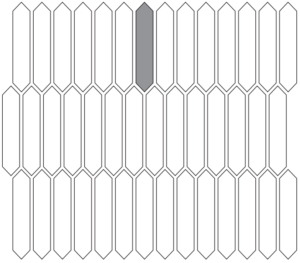
I’ll admit, these are really mosaic tiles rather than layouts. While designer tiles are more about shape instead of pattern, anyone talking about layout trends would be amiss to them leave out. Unique shapes like pickets, hexagons, arabesques, and fish scales/fan tiles have stolen the spotlight and show no signs of giving it up.
The nice thing about designer tile is that it’s so beautiful on its own, it doesn’t require a fancy layout to make it shine. In fact, most of the time there’s actually only one way to lay it out. That definitely takes care of the guesswork.
How do you lay a designer tile pattern?
It really depends on the tile shape you choose. In many cases, these specialized shapes only fit together one way. Some even come in premade sheets to save you the hassle of piecing them all together.
Two-Tile Patterns
When single tile simplicity isn’t enough to reach your design dreams, it’s time to bring in some help. By introducing another tile to the mix, you can add all kinds of variables, including color, texture, and size.
The great thing about two-tile layouts is the versatility. You can still keep it simple if you like, or you can get busy with an intricate design. It’s all up to you.
Related Content >> How to Tile a Floor
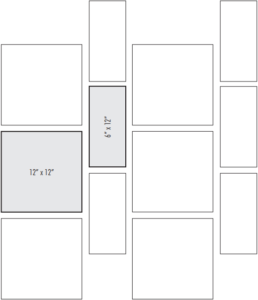
Hopscotch/Pinwheel
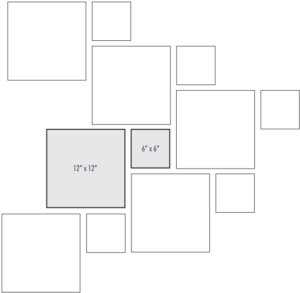
The hopscotch pattern is a real crowd-pleaser. It’s fun! It’s flowy! You can use it to play hopscotch whenever you like! Okay, so maybe that last part isn’t totally true, but you’re still going to love it so much that you’ll feel like playing hopscotch.
Also known as a pinwheel, this layout is popular in bathrooms and kitchens. It’s made from one large tile with one smaller tile “hopping” or “pinwheeling” around it. While the hopscotch design is very simple to create, it still looks classy and detailed.
Many people choose to incorporate a different material or accent color into the small tile. This is a great way to pull together different elements in a room.
Multi-Pinwheel Layout
If you want to kick it up a notch, it’s easy to make a modified flooring pattern known as the multi-pinwheel. Just add more small tiles into the mix and incorporate them into the pattern as you would with the larger tiles.
How do you lay tile in a pinwheel pattern?
You’ll need one large tile, and a smaller tile half that size. Typically, people use a 12” x 12” square along with a 6” x 6” square. Lay the large tile first, and place the smaller square at the corner to start the pinwheel.
The bottom of the next large tile will line up with the bottom edge of the small tile. Continue the pattern, filling in as you go.
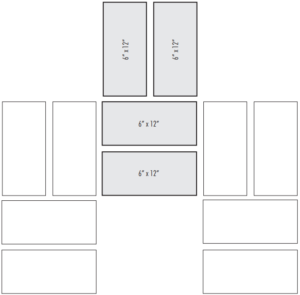
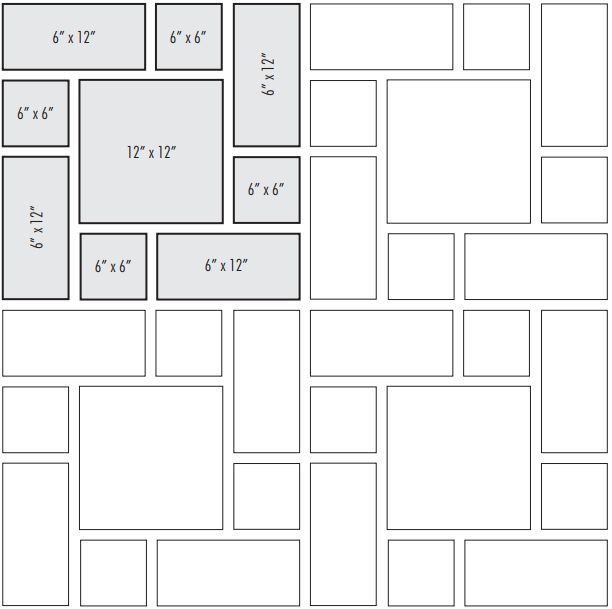
Windmill
Take a moment to imagine a tile floor in a big, luxurious entryway. Does the windmill pattern come to mind? It does for me. It’s elegant but sort of vintage at the same time, especially if you go with the usual black and white color scheme.
If you love this layout but want to modernize it, one easy way to do that is to introduce trendier features in other ways. Try an accent color for the center tile, or vary the finishes. By mixing it up, you’ll still get that same luxury look with a touch of trendy.
How do you lay a windmill tile pattern?
You’ll make this pattern using one 6” x 6” square tile and four 12” x 6” rectangular tiles. The square tile is placed at the center. Meanwhile, the rectangles frame the center to evoke the iconic image of windmill sails in motion.
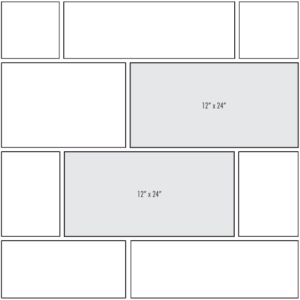
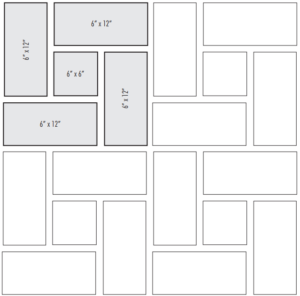
Basket Weave
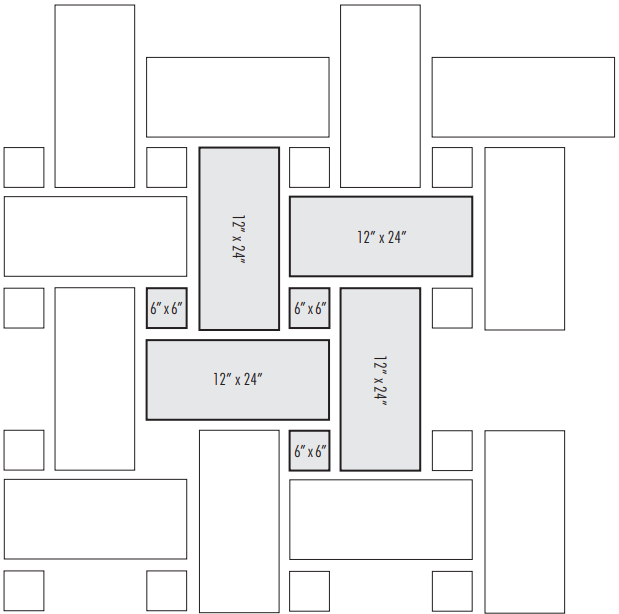
The basket weave is another woven-look tile pattern, and it’s even more popular than the simple crosshatch style. It’s easy to see why. Basket weaves introduce detail and intricacy to any space. As a traditional layout, it’s never truly going out of style.
Something else that’s great about this style is its versatility. You can dress it up or down depending on your style. Going for an understated vibe? A black and white marble-look color scheme will do just the trick.
Do you want something more modern or bohemian? Just play around with color and the material. High variation stone-look tile adds a new dimension to the room.
How do you lay tile in a basket weave pattern?
Combine 12” x 24” rectangular tiles with smaller 6” x 6” square tiles for this look. You can also purchase a single size of 12″ x 24″ and cut them down to 6″ x 6″ as needed.
The square occupies the center of the layout, and the rectangles frame the square. It might not look like much at first, but keep going. As you continue building the pattern, you’ll see the timeless pattern of a woven basket appear before your eyes.
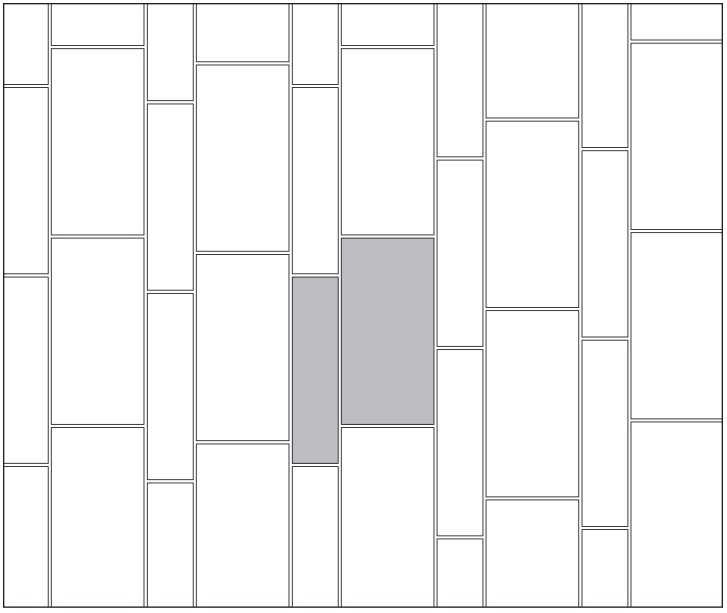
Corridor
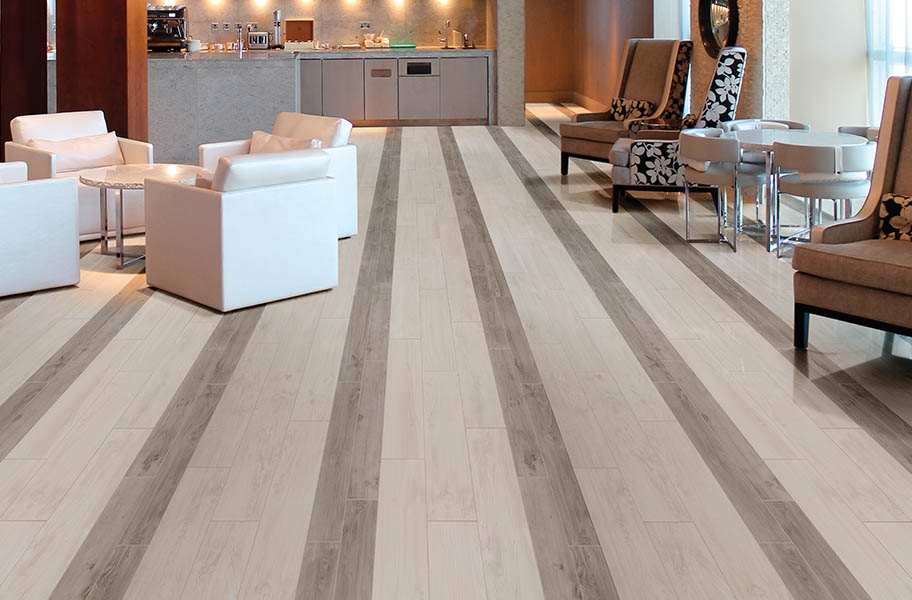
You’ve probably noticed the mixed-width trend we’re seeing in planks these days. Corridor tile patterns offer the same sought-after style.
The alternating rows (or columns) of tiles can be any width. Experiment with tile sizes and orientations to get a customized mixed-width look that’s uniquely your own.
Since they’re so customizable, corridors are easy to create and easy to modify. There are plenty of variations of the corridor layout to choose from. Still, even with all these variations, corridors give any space a clean, contemporary look.
How do you lay tile in a corridor pattern?
Most people choose one square tile and one rectangular tile. They can be any size you like. You also have the option of purchasing one tile and cutting them into different sizes. Alternate the tiles every other row, so you have one row of squares and one row of rectangles. Along with alternating tile sizes, you can alternate the orientation of rectangles from row to row.
Tic Tac
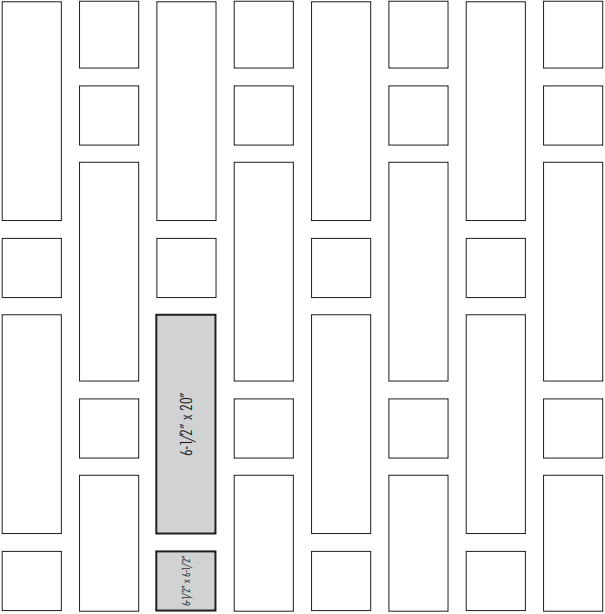
A tic tac tile pattern is a close cousin to the corridor, but instead of alternating tiles row by row, tiles alternate within the row to create a dot and dash pattern. This is a very modern look with clean lines that are broken up by the “dot” tiles.
You can orient the tic tac layout vertically or horizontally, depending on preference, though the vertical orientation does a better job of making the room feel taller and larger. For a bit of added fun, select a tricolor color scheme for even more depth and contrast.
How do you lay a tic tac tile pattern?
Use two tiles with the same width but varying heights, such as a 6” x 6” square and a 6” x 20” rectangle. The longer the rectangle the better. Create a running bond and offset the rows by 1/3. Alternate between long and shorter tiles within each row to create the pattern.
| Related Content >> Backsplash and Mosaic Tile Guide |
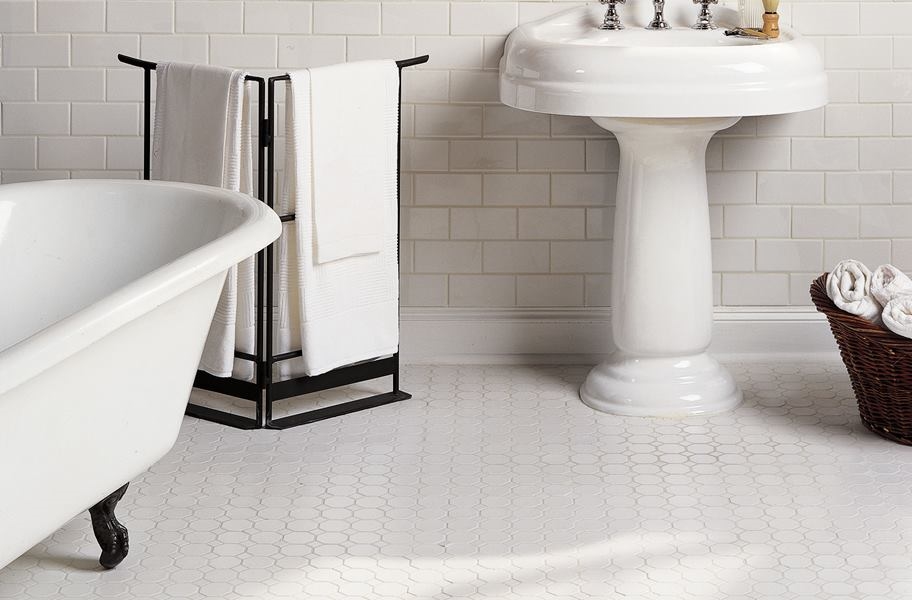
Hexagon Dot/Octagon Dot
Vintage style is huge right now, and nothing says “vintage” like hexagon or octagon dot tile. Your grandmother probably had this pattern in her kitchen, with that signature black and white color scheme. While it gives off a definite antique vibe, there’s also something really timeless about it.
Large square tiles are set into a grid and dotted with smaller squares at the corners. Some people call those corner squares “drops” or “inserts.” They provide the perfect opportunity for an accent, and they transform those square tiles into hexagons or octagons by truncating the corners.
How do you lay tile in a hexagon dot/octagon dot pattern?
It used to be that the only way to get this look was through a lot of tedious measuring and cutting. You would have to cut all the corners from square tiles. In the square opening left behind, you would drop or insert the accent tile. Hence, the terms “drop” and insert.”
Here’s the good news: a lot of the time, you can buy prefabricated sheets already laid out and ready to install. Thank goodness!
If you can’t find the look you want from those premade sheets? You can still break out the tile cutter in an emergency. Or, you can improvise and use the hopscotch layout, which is easier to install and looks just as good.
Three-Tile and Multi-Tile Patterns
Maybe you’ve been around the block a few times, and even a two-tile design is nothing to you. If you want to kick it up a notch with advanced patterns, you’re going to need at least three tiles to work with, and possibly even more.
Here’s where the real customization comes into play, so your floor, or wall, or shower, or whatever won’t look quite like anyone else’s. Can it get a bit complicated? Yes. But will it be worth it? Double yes.
Related Content >> Tile Grout and Thinset Buying Guide
Layered Corridor
You don’t need to stick to only two tiles to achieve the corridor style. A layered corridor, which uses at least three different tiles, adds even more dimension and customization. While it definitely looks more complex, it’s still as easy to install as the two-tile corridor pattern.
Plus, with a layered corridor, you can do more than just alternate the tiles every other row. Mix things up a little! Create your own pattern or make it completely random. The choice is yours, and the only limitation is your imagination.
How do you lay tile in a layered corridor pattern?
Select the three or more tiles you want to include in the layout. It’s a good idea to include a variety of sizes for the best results. Alternate the tiles from row to row, changing the orientation of the rectangles as you see fit.
Divisible
If you like math, this just might be the style for you. A clever combination of squares and rectangles creates an effect that’s almost like an optical illusion as the tiles “divide” into equal pieces.
Let’s be honest – even if you absolutely hate math, there’s still a lot to love here. It’s bold, modern, and unique. There’s also a balance between clean lines and an intricate pattern that you won’t find with every pattern.
How do you lay tile in a divisible pattern?
Start with a large square, then place two smaller rectangles side by side to equal the size of the square. Ta-da! It’s as if the larger tile split in half. Go one step further with four even smaller squares to create the appearance that the tile split into quarters.
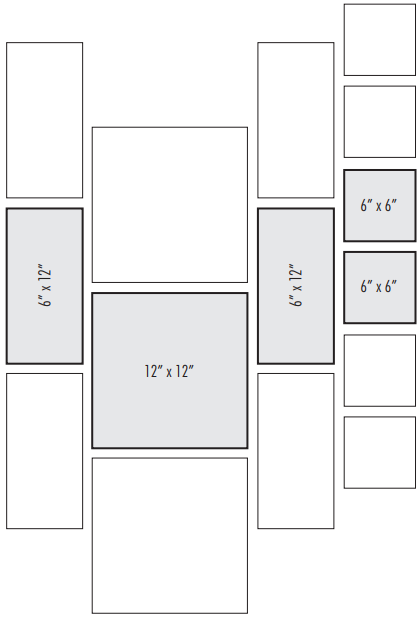
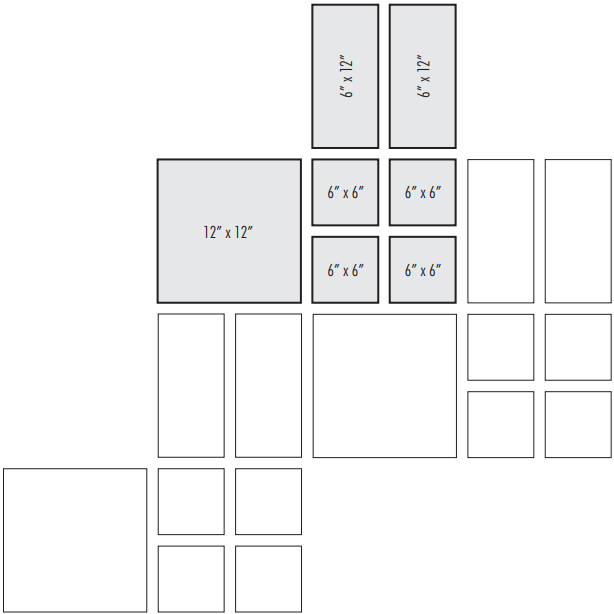
Soldiered
Soldiered tile is very similar to the windmill layout, except the center square tends to be much larger, and the bordering tiles are broken up into rectangles and smaller squares. By breaking up the border, this layout offers a more detailed and dynamic look without a lot of effort.
The additional tiles bring this pattern into the 21st century without sacrificing the traditional style of the windmill layout. Pair that with an accent color or a trendy tile material, and you’ve got yourself the best of both worlds.
How do you lay tile in a soldiered pattern?
You will need a large square tile, and another square half that size. People often opt for 12” x 12” and 6” x 6” tiles, plus a 6” x 12” rectangular tile to polish off the look. Don’t forget that you can cut tiles to size as needed. Start with the large square at the center, alternate between rectangles and smaller squares as you build a border around the center.
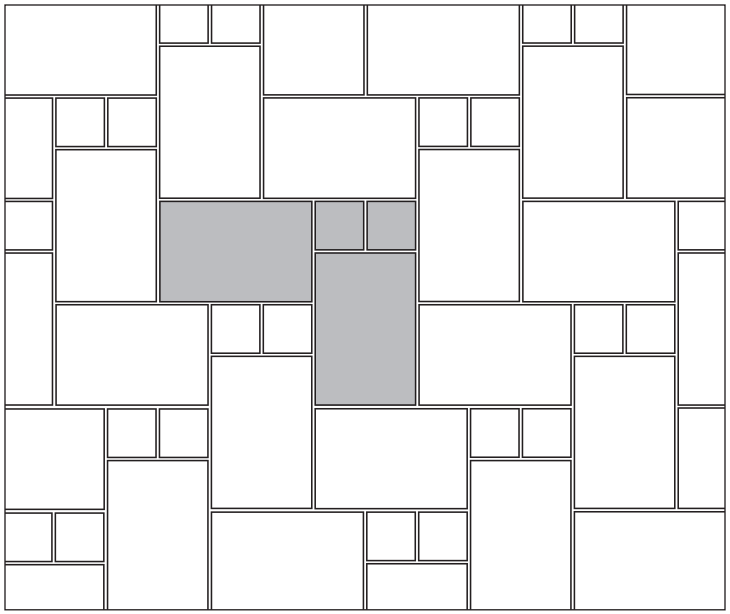
Versailles/French
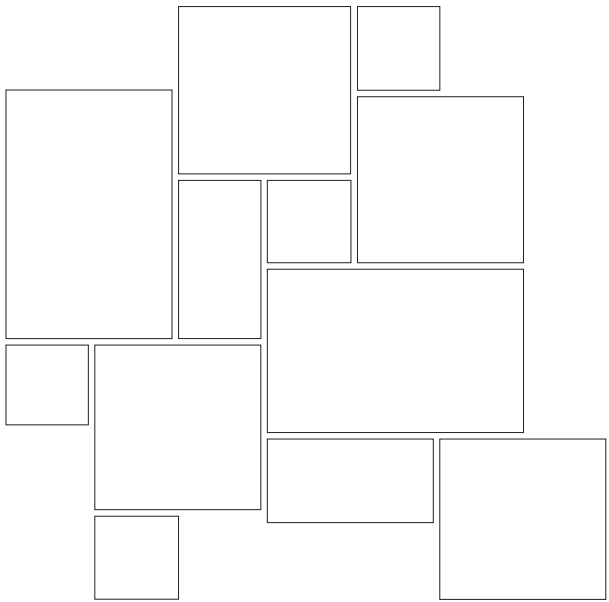
Even if you’re not an expert on tile layouts, you’ve probably heard of the Versailles tile pattern. Also known as the French pattern, this tile design requires four tiles to get the right look. Use this style with stone and stone-look tile for a match made in heaven. The arrangement pairs perfectly with natural color and texture variations.
While Versailles floors are famous for their seemingly randomized appearance, don’t be fooled! Within that beautiful chaos is a pattern you can replicate in your own home. You’ll need to carefully measure your room and get the exact proportions of each tile size, but from there, it’s not nearly as complicated as it looks.
How do you lay tile in a Versaille pattern?
To make one repeatable block of the layout, you will need four 8” x 8” squares, four 16” x 16” squares, and two each of 8” x 16” and 16” x 24” rectangles. Place three of the larger squares and two larger rectangles, leaving an L-shaped gap in the center, fill this gap with one smaller square and one smaller rectangle. If that seems hard to picture, it can be easier for you to follow along with an image as you plan the layout.
Large-Format Tile Patterns
Large tiles can present a challenge when it comes to finding a fitting layout, in part because they can be cumbersome and harder to handle, but also because they’re not as versatile as small tiles. Really complicated patterns can get lost in the size of the tiles.
So how do you add some personality to your floor if you’re not interested in a simple grid for your 12” x 24” or 24” x 24” large format tiles? The secret lies in modifying layouts that are made for smaller tiles. With a few small tricks, you can introduce energy to a simple design.
Related Content >> Porcelain vs. Ceramic Tile: Learn the Difference
Stepped Vertical Brickwork
With a large rectangular tile, vertical orientation always helps to make the room feel larger. Combine that vertical look with stepped brickwork for something that’s fresh but familiar all at once.
A standard brickwork layout balances out the offset from row to row, but with this method, you want to emphasize a flow. Use incremental offsets that gradually “step” in one direction to create a sense of movement. This should liven up a large tile in no time.
How do you lay tile in a stepped brick pattern?
You can use any rectangular tile for this method, though it works especially well with large format tile. Align the tiles vertically in each row to make the most of the length. Each row should be pushed or “stepped” forward by an incremental amount.
Staggered Corridor
Our old friend the corridor is back for one last hurrah with a staggered variation. By randomly staggering the rows, you get a simple style that is at once playful and contemporary.
Longer tiles excel with this pattern since the staggering creates a waterfall effect. For the best result, experiment with width. Consider really thin tiles in combination with more traditional shapes. Variation between colors and finishes can also punch up the look of your space.
How do you lay tile in a staggered corridor pattern?
By now you probably get the picture, but here’s a refresher just in case. Align the tiles vertically, alternating tiles between rows. Randomly stagger the offsets from row to row to achieve this look.
Herringbone Inserted
The herringbone pattern is back and better than ever in this variation for large format tiles: the herringbone insert. This time, we’ll bring in some smaller “helper tiles” to create that iconic L-shape that’s stylish right now.
By inserting square tiles into the corner, you’re elongating the shape. At the same time, the corner tiles break up the longer sightlines with something that’s simple yet visually interesting. What more could you ask for?
How do you lay tile in a herringbone insert pattern?
Start with two large format rectangular tiles. Create an L, but leave space to insert two squares at the corner where the larger tiles join. You made need to cut down the tile to create the squares. Once you make this shape, you’ll repeat it just like you would with traditional herringbone.
Backsplash Tile Patterns
A lot of designs you can use on the floor work just as well on a backsplash. It’s just on a smaller scale. Still, maybe you want something that’s quintessentially backsplash.
Plenty of backsplash tile now comes with premade sheets that can simplify the process by eliminating some of the steps. However, if you can’t find the exact look you’re picturing, these suggestions can give you some much-needed inspiration.
Related Content >> Wall Tile Trends
Lacework

Backsplash designs are often busy, and this style is no exception. A combination of squares and rectangles work together to create a delicate design that resembles lace fabric. While some lines are clean and run through the pattern, others are broken up for a lacy look.
A lacework tile backsplash might look a little familiar. That’s because lacework is a close relative of the tic tac pattern. Unlike tic tac tiles, lacework is normally installed at an angle to emphasize the mesh of lines. It’s the perfect accent pattern for a minimalist kitchen or bathroom.
How do you lay backsplash tile in a lacework pattern?
Install small square tiles and rectangles in alternating rows. Offset the rows so that short tiles and long tiles align to create a line break. Be sure to follow a 45-degree angle as you go along.
Here’s a helpful hint: You can use subway tiles for the entire pattern. Simply cut some of the tiles in half along the longest end.
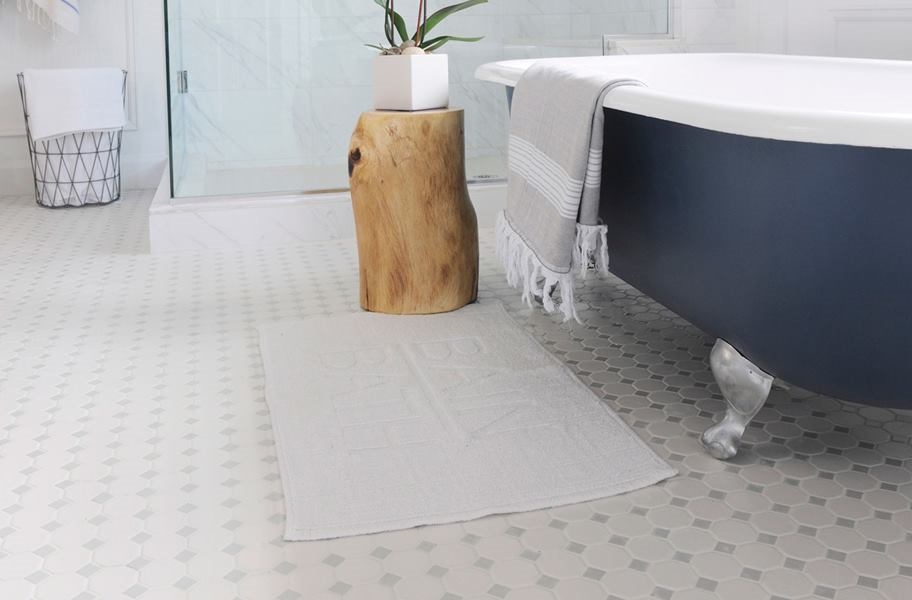
Hexagon
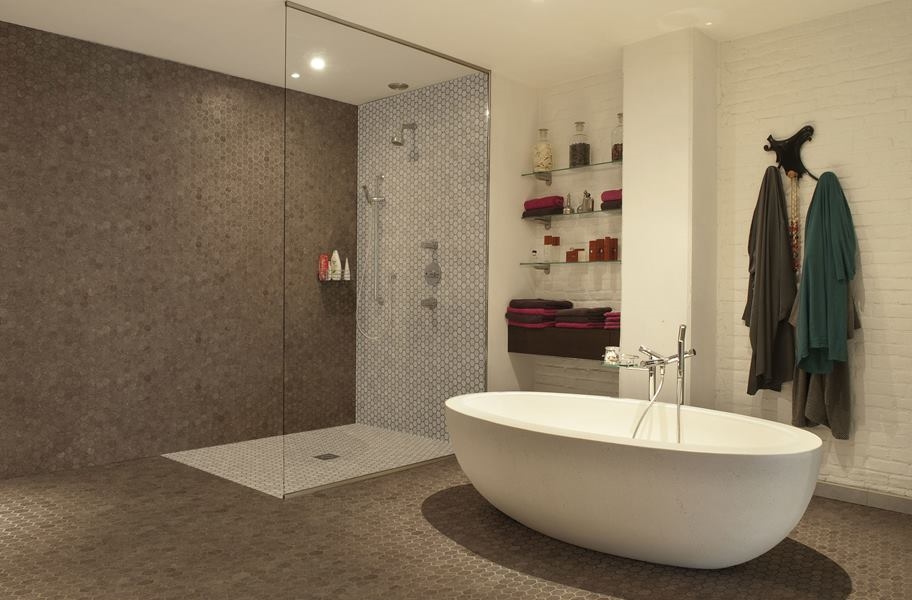
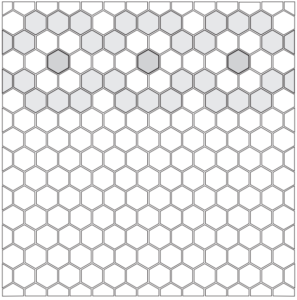
“Hexagon” isn’t exactly a tile pattern, since there’s only one way to put them together, but sometimes you’ve got to think outside the box. It’s easy to integrate patterns within the hexagons by using contrasting colors and textures.
Some of the most common hexagon patterns include concentric honeycombs, flowers, waves, and more. Designers are even starting to throw all the rules out the window and develop layouts without any distinct patterns. Hexagons are perfect for this experimental style, but if you really want to get creative, mix tile shapes in addition to color. Non-linear tile transitions from hexagons to planks are really popular right now.
How do you lay backsplash in a hexagon tile pattern?
It’s easy to lay hexagon tile once you’ve done the work of picking the look. Determine if you want a traditional layout, or if an experimental style would be a better fit for you. Once you have a design in mind, the installation part can be pretty simple.
Related Content >> Accent Wall Ideas
Vertical Brick
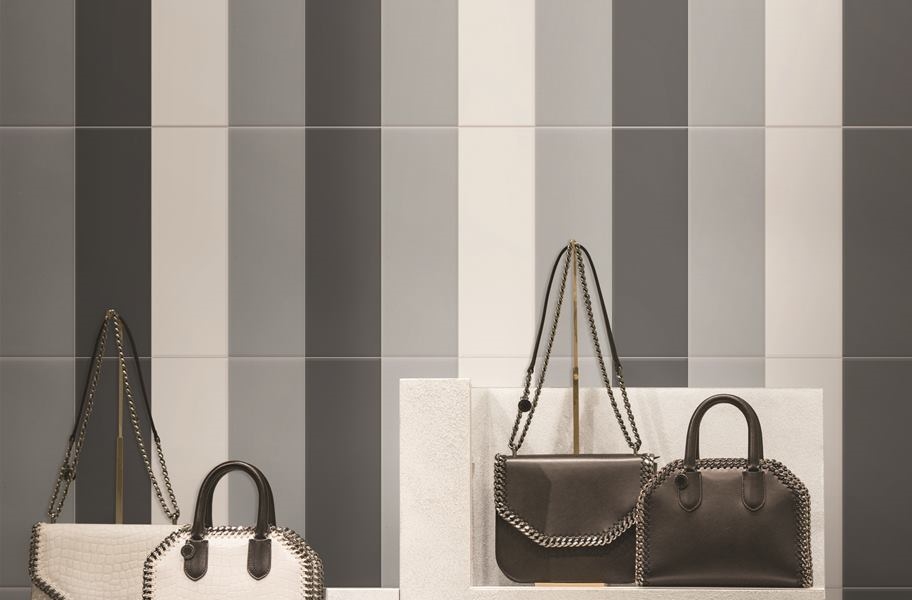
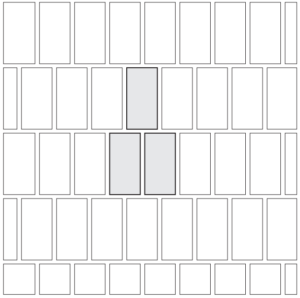
If you like the look and simplicity of brickwork but you want to give it a little bit of pizzazz, it’s easy to turn the pattern on its head. Vertical brick backsplashes were made to showcase beautiful subway tile or even real brick. The uniformity is perfect for industrial or farmhouse style kitchens.
Sometimes your backsplash can seem cramped, or maybe your kitchen feels too small. This layout is all about emphasizing clean vertical lines, which will visually lengthen the space. In no time you’ll feel like you have all the room in the world.
How do you lay backsplash tile in a vertical brick pattern?
With a brick or subway tile of your choosing, lay a running bond along the backsplash area. Since the tiles are oriented vertically, a 1/2 offset is the best way to achieve balance.
Brick with Diamond Border
For a tried and true design, nothing beats a brick backsplash with a running bond. While it might not be the most adventurous look on its own, the diamond border crowns this pattern as a classic.
It’s virtually impossible to go wrong with a brickwork and diamond border backsplash. It works with every style, from the sleek and ultra-modern to the vintage and cozy. It all depends on the material you use. Exposed brick or subway tile? Black or white or something in between?
Because it’s so versatile, this pattern is a canvas to make your own masterpiece.
How do you lay backsplash tile in a brick and border pattern?
Start by installing a subway tile or brick in a 1/2 offset running bond. When you near the top of the backsplash, transition to the border tiles and install them in their own row. Use square tiles for the diamond design, and cut some in half along the diagonal. Cap the border with a final row of the rectangular tile to finish the look.
Related Content >> How to Install Backsplash Tile
Conclusion
Did we miss anything? Leave it in the comments – we’d love to hear your thoughts!
As you can see, there’s a lot going on with tile patterns right now. There are plenty of different, unique options trending that will likely stick around for years to come, which means your possibilities are endless.
If you have any questions, or if you want more help creating the perfect tile layout for you, get in touch! We can hook you up with a personal flooring consultant.
Or if you’re ready to get creative with tile on your own, you can start with free samples.
ORDER FREE SAMPLES SHOP ALL TILE
Chelsi Hewitt is a Phoenix-area content marketing professional. She joined Flooring Inc. to teach people about flooring, interior design, home trends, and more.
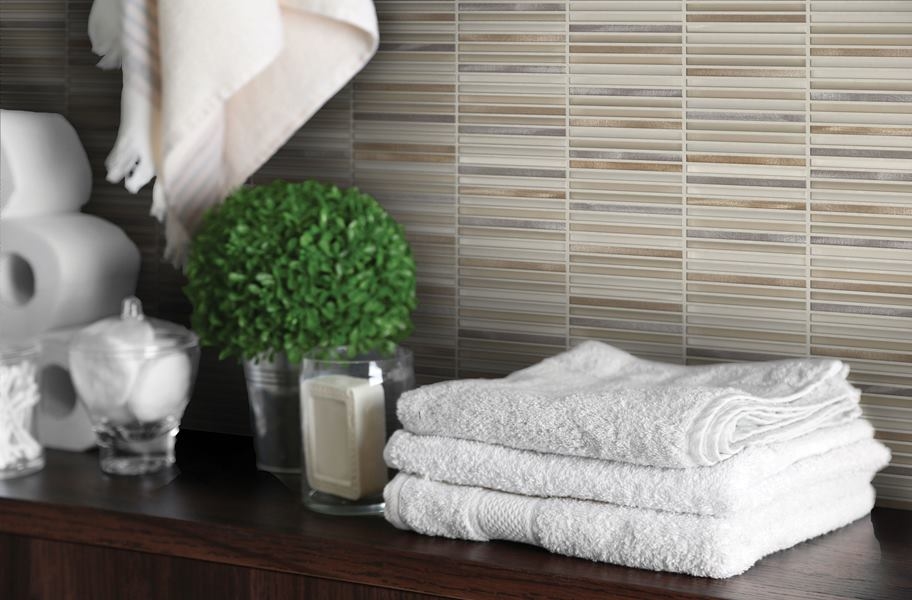
Daltile Fabrique Mosaic
Daltile’s Fabrique Mosaic is a 2”x2” tile mesh mounted on sheet for easy install. The fabric visual adds a delicate elegance to design from different textures and colors while working with square and linear options from the Fabrique collection.
Shop Now >>
Daltile Forest Park
Daltile's Forest Park collection is made with Colorbody porcelain, meaning that the color goes through the tile. Unlike other floor tiles, if the surface of these planks does become damaged, the color goes through the tile making it less noticeable.
Shop Now >>
Daltile Season Wood
If you are looking for a naturally weathered wood plank that is incredibly durable and easy to maintain, the Season Wood porcelain tile is the perfect solution for you. Offered in very large plank sizing to replicate real hardwood this collection also offers the extreme durability of a porcelain body.
Shop Now >>
Daltile Color Wheel
- Daltile’s Color Wheel collection offers a wide spectrum of colorful selections. The wide variety of the color palette tends to be a favorite among designers while providing ceramic tile with a glazed finish and a matte finish to inspire the imagination.
Shop Now >>
Daltile Octagon Dot
Daltile’s Octagon & Dot is a fashionable remake with octagon shapes tiles by 4 smaller tiles available in a variety of colors. The patterning creates an effect that can be found in the homes of yesterday.
Shop Now >>
